OWLOS Flight Radar

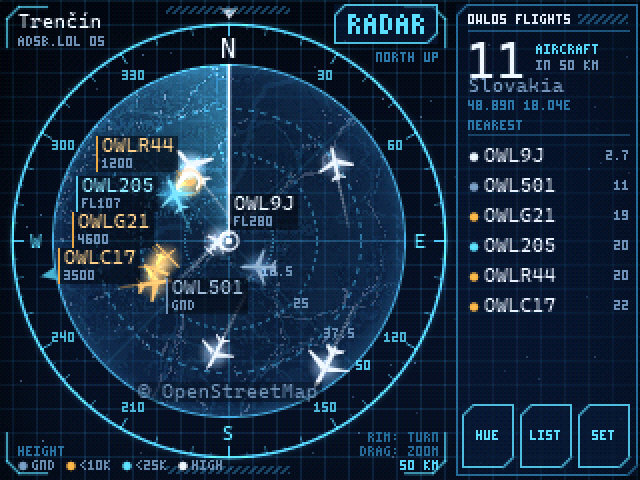
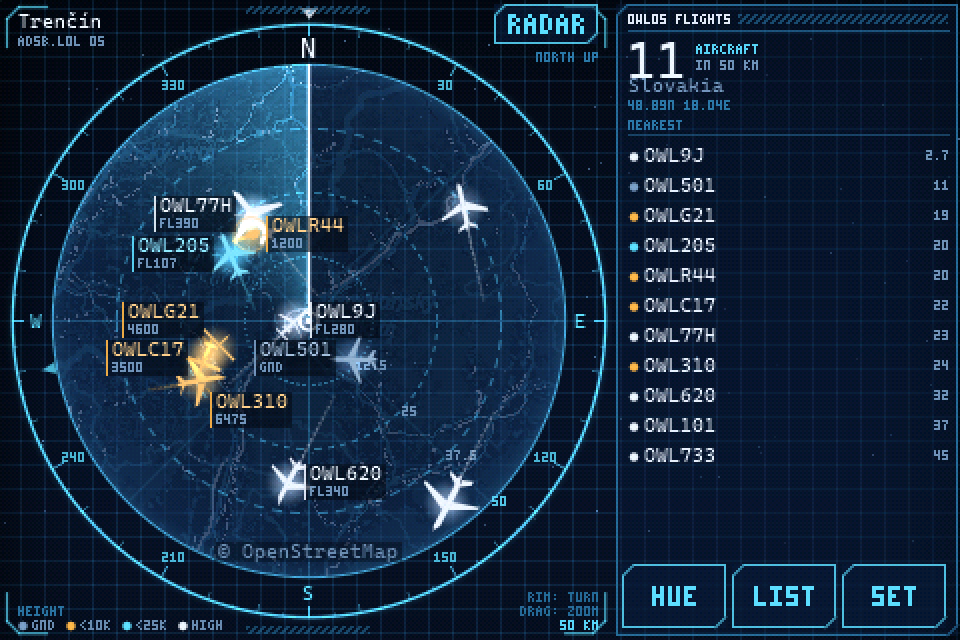
The planes around your home on an ESP32 board with a screen: each one a silhouette turned the way it flies, coloured by its height, with a trail behind it. Tap one for its callsign, type, height and speed. It takes the planes from the free community ADS-B networks, or from Flightradar24 if you have a key. Flash it below, then send it your WiFi and your home point over the same USB cable.
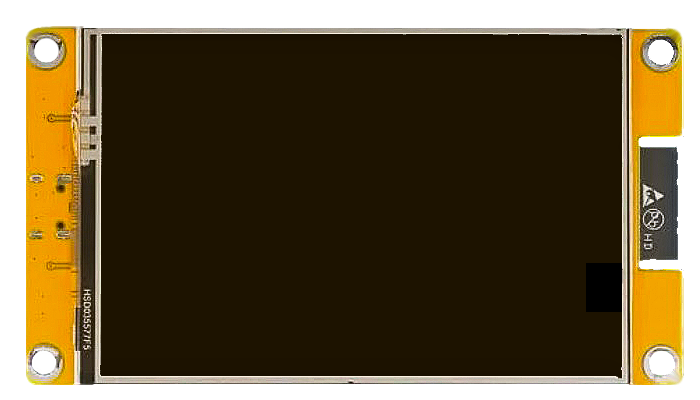
an ESP32 board with a 3.5 inch screen
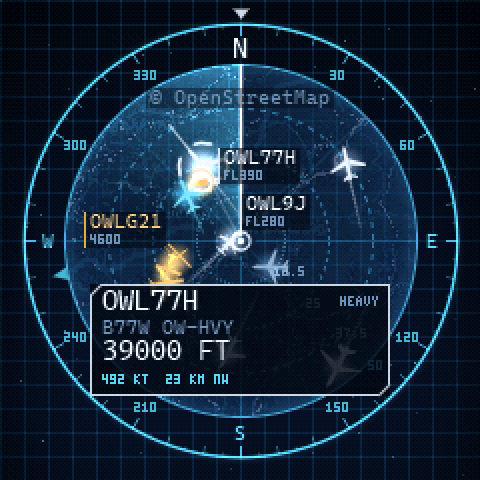
THE PLANES AROUND YOUR HOMEhome in the middle, each one turned the way it flies

1 / FLASH THE BOARD

  1. Use Chrome or Edge on a computer. Flashing goes over Web Serial, phones and Firefox can't do it.
  2. Plug the board in with a USB cable that carries data (some only charge).
  3. Press CONNECT & FLASH of your board, pick its port and say yes to erase: whatever was on the board is replaced.
  4. No port in the list? On Windows the CH340 driver may be missing. Won't connect? Hold BOOT while you plug it in.
  5. Boards with touch ask you once to press 5 crosses, so the touch knows where the screen is.
  6. 2.8" CYD with the picture mirrored or in wrong colours: press BOOT in the first 8 seconds after power on. How, under the boards.
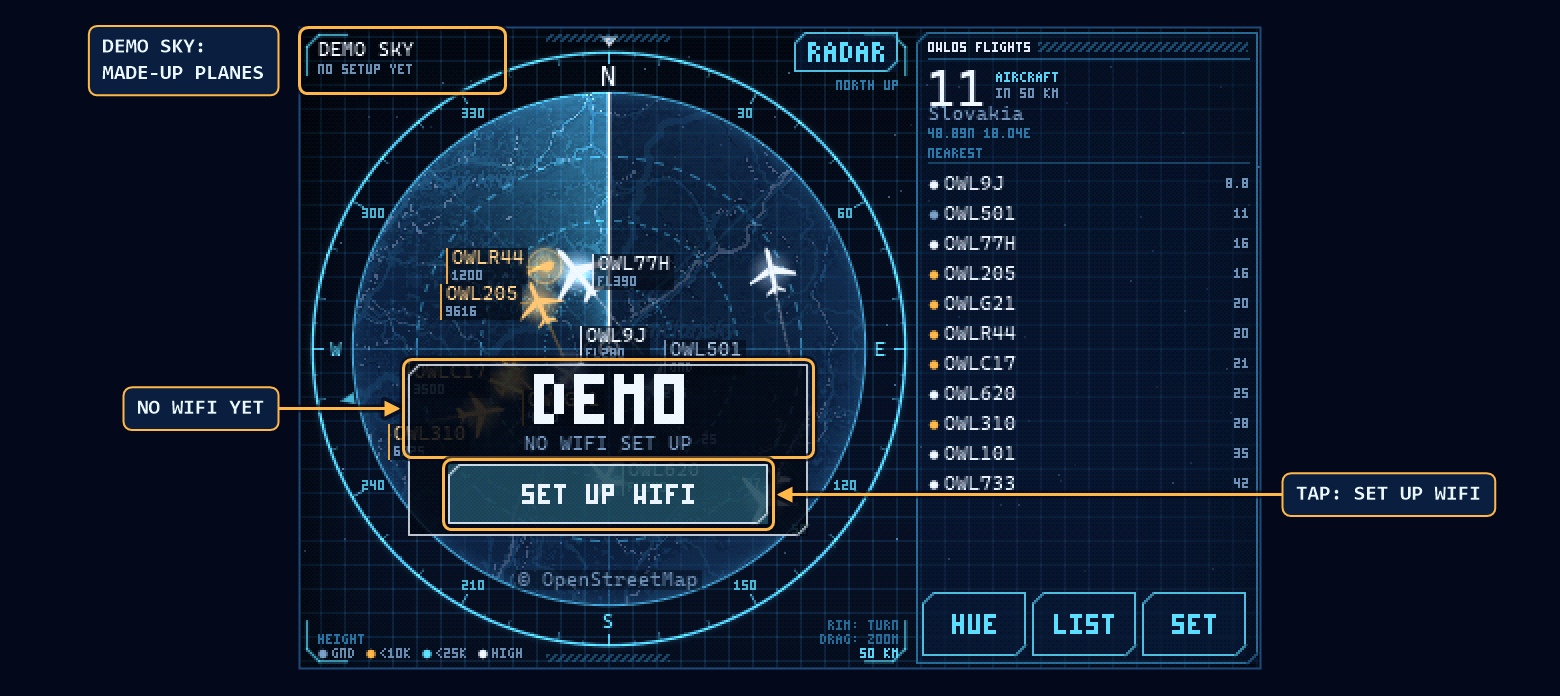
  7. Until it has WiFi the board flies a made-up DEMO sky and says so in big letters. The 2.8" and 3.5" CYD take the WiFi right there: SET UP WIFI, tap your network, type its password (step 3 shows where). Or send it from this page, step 2.
  8. Close the flasher's window when it's done: the port is free again for step 2.
the radar on the 2.8 inch board

2.8" CYD

"Cheap yellow display", ESP32, 320x240, resistive touch. Sold with three different screens, this one build fits them all. It starts as v2, the one most boards have.
WRONG PICTURE? PRESS BOOT This browser can't flash. Use Chrome or Edge on a computer. Flashing needs the page over https.
the radar on the 3.5 inch board

3.5" CYD

ESP32, ST7796 480x320, resistive or capacitive touch (R and C versions, found by itself). The board in the film: a bigger scope, the panel lists more planes.
This browser can't flash. Use Chrome or Edge on a computer. Flashing needs the page over https.
the radar on the round screen

1.28" round

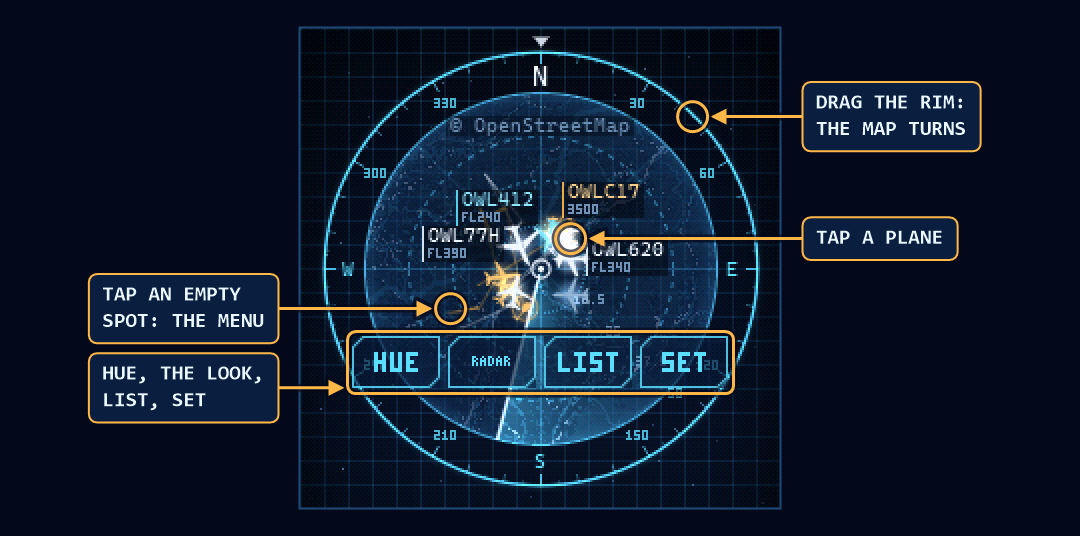
Elecrow CrowPanel, ESP32-C3, GC9A01 240x240, capacitive touch. The scope is the whole glass: tap a plane for its card, tap nothing for HUE, LIST and SET.
This browser can't flash. Use Chrome or Edge on a computer. Flashing needs the page over https.
the radar on the 3.5 inch RPi LCD

3.5" RPi LCD (ILI9486)

Waveshare RPi LCD (A) on the OWLOSAirQuality board, ESP32, 480x320, no touch: BOOT steps through the planes, hold it for the next range. Map up, colours and upside down come from step 2.
This browser can't flash. Use Chrome or Edge on a computer. Flashing needs the page over https.

2.8" CYD: WRONG PICTURE? PRESS BOOT

The 2.8" CYD is sold with three different screen chips that look the same from outside, and the board can't tell which one it has. It starts as v2, the one most boards have. Picture mirrored, upside down, in wrong colours or like a negative: your screen is another one, and the BOOT button switches it.

  1. Power the board on, or press RST and let go.
  2. Within 8 seconds press BOOT once, briefly. A card on the screen says which one is on and shows the time left. On the 5 crosses page right after flashing BOOT works at any time.
  3. Every press starts the screen as the next one: v2, then v1, then v3, and round again. Press till the picture looks right.
  4. That's all: the board keeps it, through a reset and a power cut.

Missed the 8 seconds? Press RST and start again. Don't hold BOOT while you press RST: that wakes the flasher and the screen stays dark.
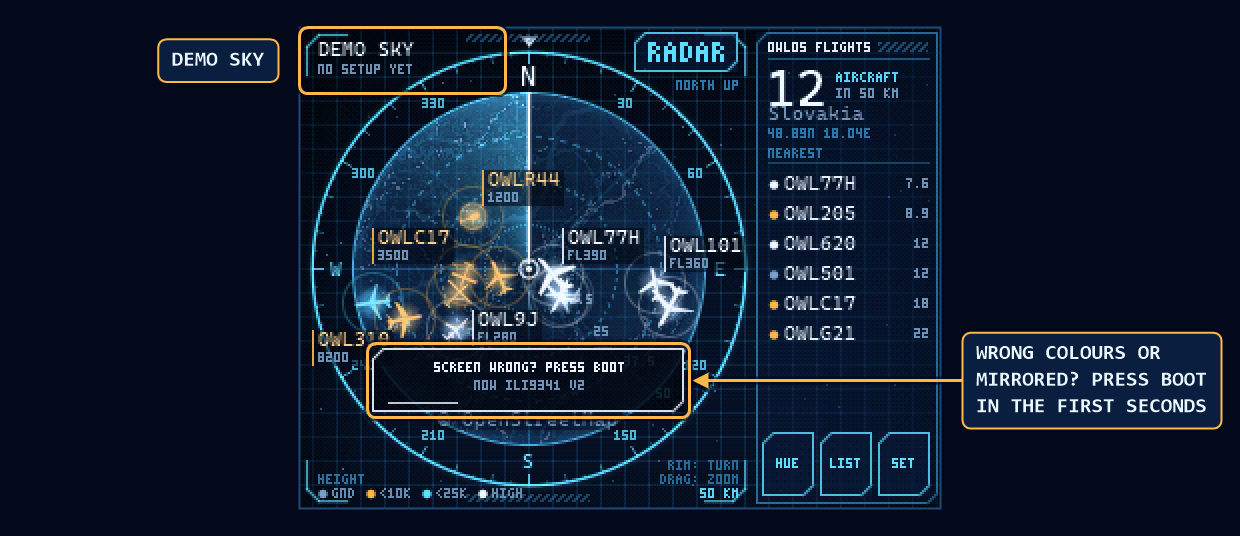
the 2.8 inch board in its first seconds: a card says SCREEN WRONG? PRESS BOOT and which screen is on

2 / SEND IT YOUR SETTINGS

WIFI

The ESP32 sees 2.4 GHz networks only. A router with one name for both bands works. Leave both empty and the board keeps the WiFi it has, for one set on its own screen.

HOME

The middle of the scope, kept on the board as you type it. Till you send one the board sits in Trenčín, Slovakia; leave the numbers empty and it keeps the home it has. The plane network only hears it rounded to about a kilometre: enough to say where to look, not where you live. The town and its country come from OpenStreetMap, asked with the same rounded point; leave them empty and the board asks for them itself.

WHERE THE PLANES COME FROM
THE SCREEN

Optional. Boards with touch change these on the screen itself (the look's button over the scope, and SET). The 3.5" RPi LCD has no touch: set them here. The map comes from OpenStreetMap: the board downloads the few pictures of it round home that the scope shows and keeps them in its flash, so a range it has shown once comes back at once, even without WiFi.

The password and the key go from this page into the board over the USB cable and nowhere else. The page keeps nothing. The board never shows them and never sends them back: it only says whether a key is stored. You can change the screen's own settings later on the board itself.

    What the board says


    3 / ON THE SCREEN: WHERE TO TAP

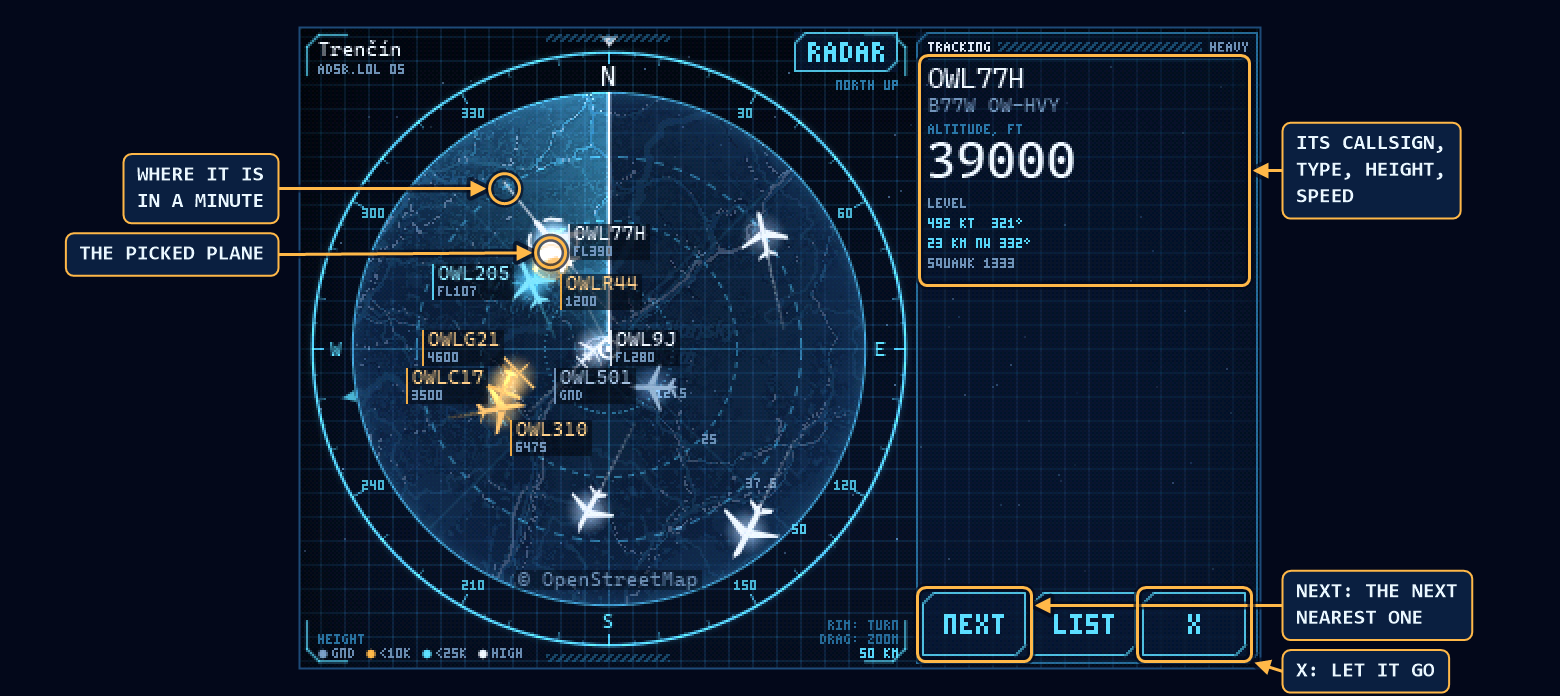
    The pictures are the 3.5" board, the 2.8" one has the same screens a little smaller. Tap a picture to see it full size.
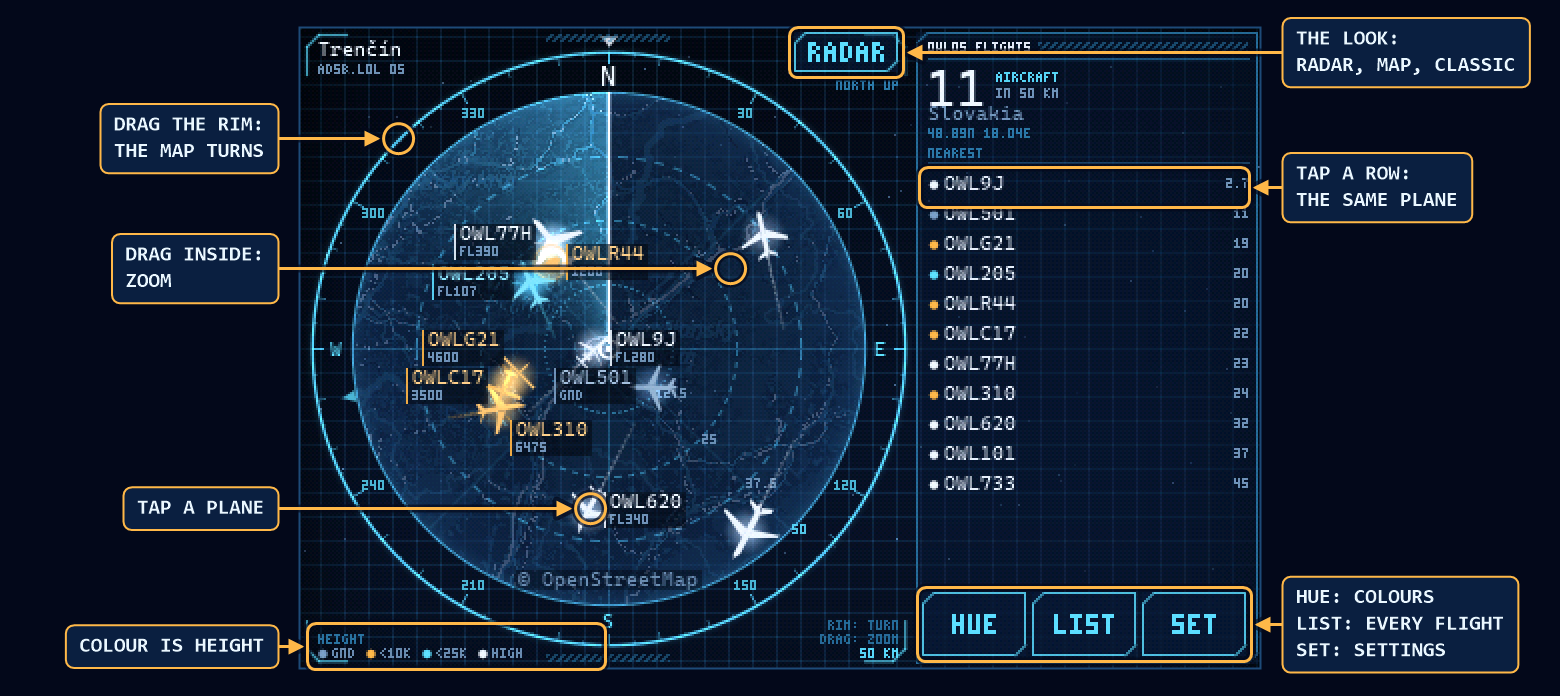
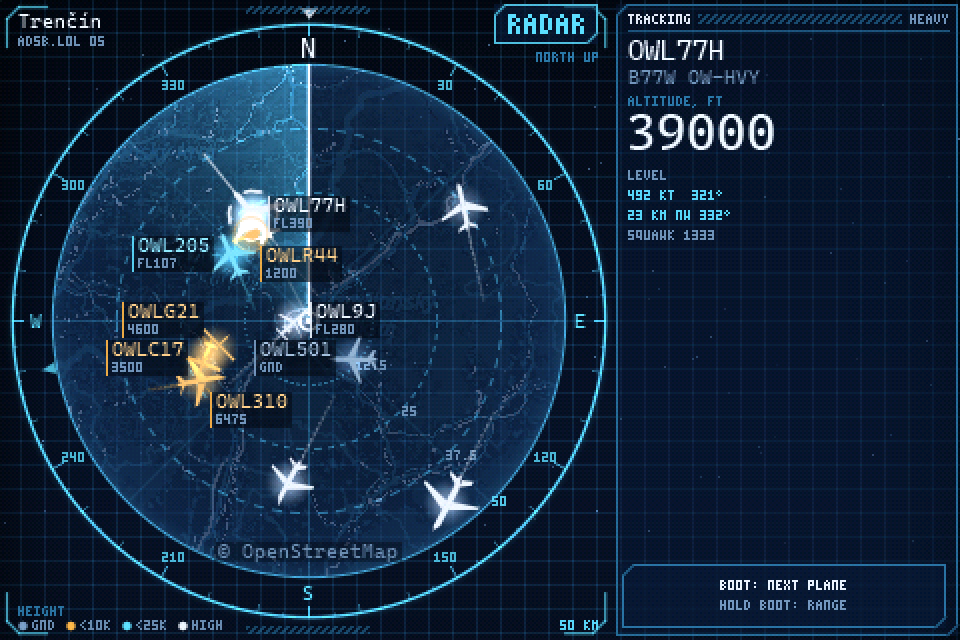
    the radar look with arrows: drag the rim, tap a plane, drag inside, the look button, the list of the nearest, HUE, LIST and SET

    THE RADAR

    • Tap a plane for its details in the panel. A row of the panel's list picks the same plane.
    • Drag the rim to turn the map: match it to the way the screen stands. Back near north it snaps to north up.
    • Drag inside to zoom: away from home in, toward home out. BOOT steps through 5, 10, 25, 50, 100 and 200.
    • The look, top right, goes round RADAR, MAP and CLASSIC: the beam over the map, a square map north up, the same map in its own colours.
    • HUE changes the colours, LIST shows every flight, SET has the settings.
    • Colour is height: grey on the ground, warm under 10 000 ft, the theme's colour up to 25 000, white above. Emergency squawks blink.
    a plane picked: its details in the panel, the line ahead of it, NEXT and X

    A PLANE PICKED

    • The panel says its callsign, type and registration, height, speed and track, how far it is and which way, its squawk.
    • The line ahead of it is where it will be in a minute.
    • NEXT picks the next nearest one, X lets it go.
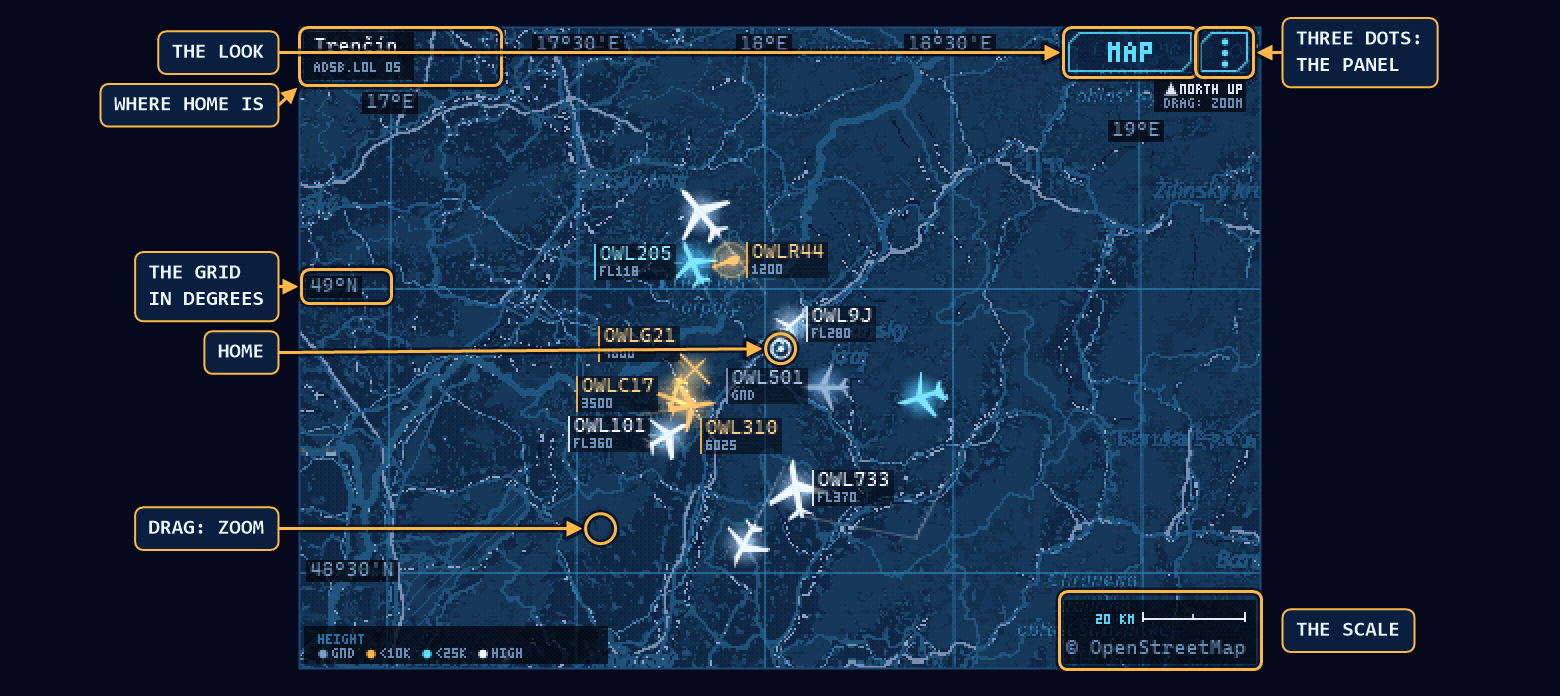
    the map look with arrows: where home is, the grid, home, drag to zoom, the look, the three dots, the scale

    THE MAP

    • MAP is a map over the whole screen, north up, home in the middle. CLASSIC is the same map in OpenStreetMap's own colours.
    • The grid's lines are whole degrees or minutes, named at the edges. The scale is in the corner.
    • The three dots slide the panel in and out. A picked plane brings it by itself.
    • Drag anywhere on the map to zoom.
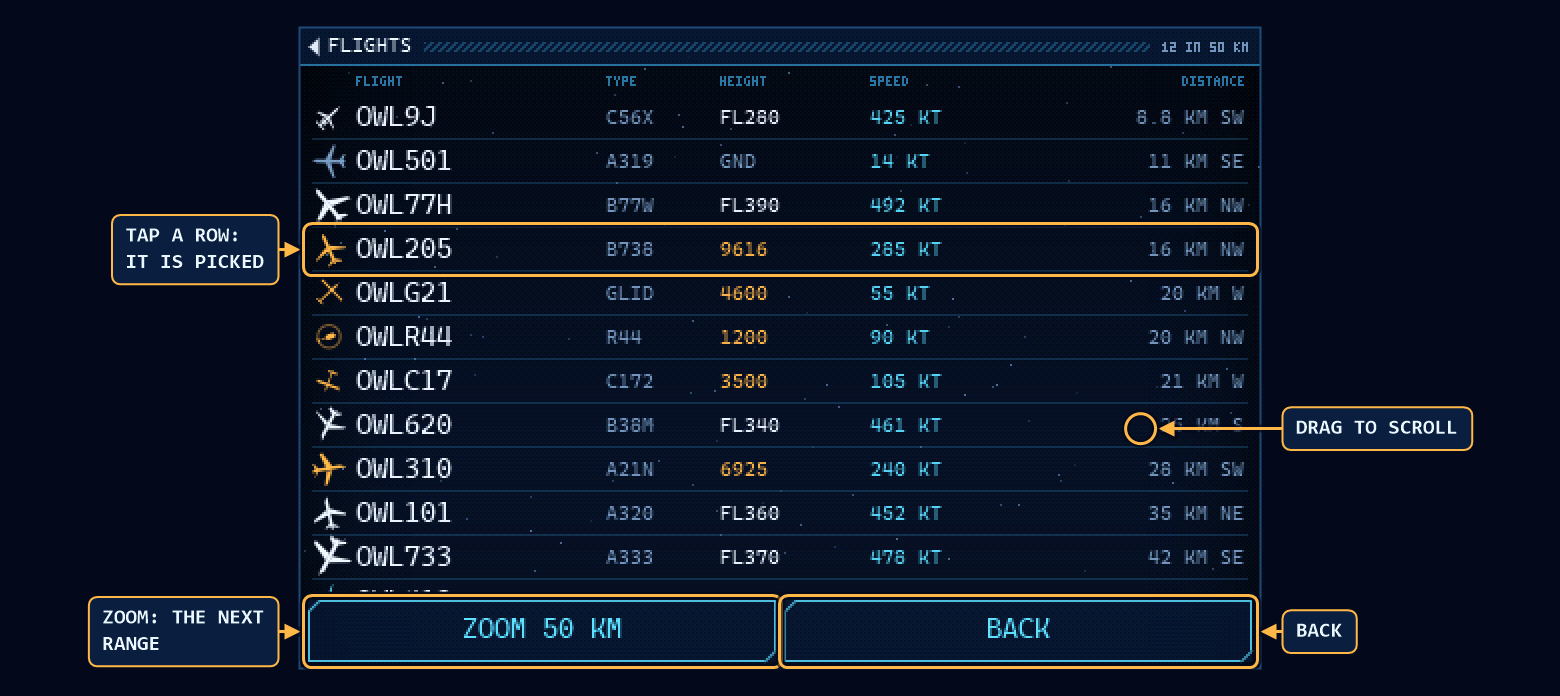
    the list of flights with arrows: tap a row, drag to scroll, ZOOM and BACK

    LIST

    • Every flight in range, the nearest first: its type, height, speed, how far and which way. Drag to scroll.
    • Tap a row and that plane is picked on the scope. ZOOM steps the range, BACK goes back.
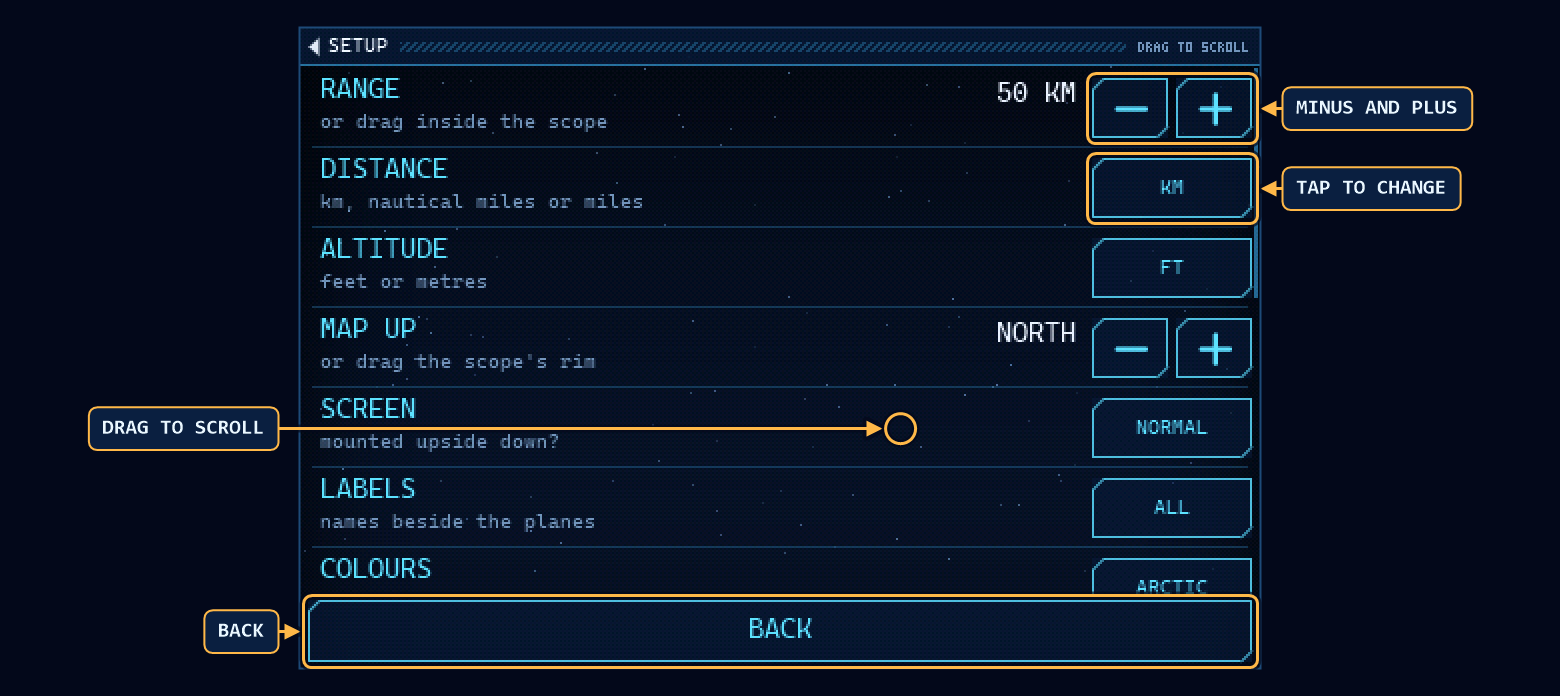
    the settings page with arrows: minus and plus, tap to change, drag to scroll, BACK

    SET

    • The range and its units, height in feet or metres, map up, the screen upside down, labels, colours, the look, the map, where the planes come from, the WiFi and the touch alignment.
    • Tap a button to change it, minus and plus for numbers. Drag to see the rest.
    the demo sky: DEMO in big letters, no WiFi yet, the SET UP WIFI button

    NO WIFI YET: THE DEMO

    • Without WiFi the board flies a made-up sky and says DEMO in big letters. Under it why: no WiFi set up yet, the one set can't be seen, or its password looks wrong.
    • SET UP WIFI opens the networks. The same is in SET, the WIFI row.
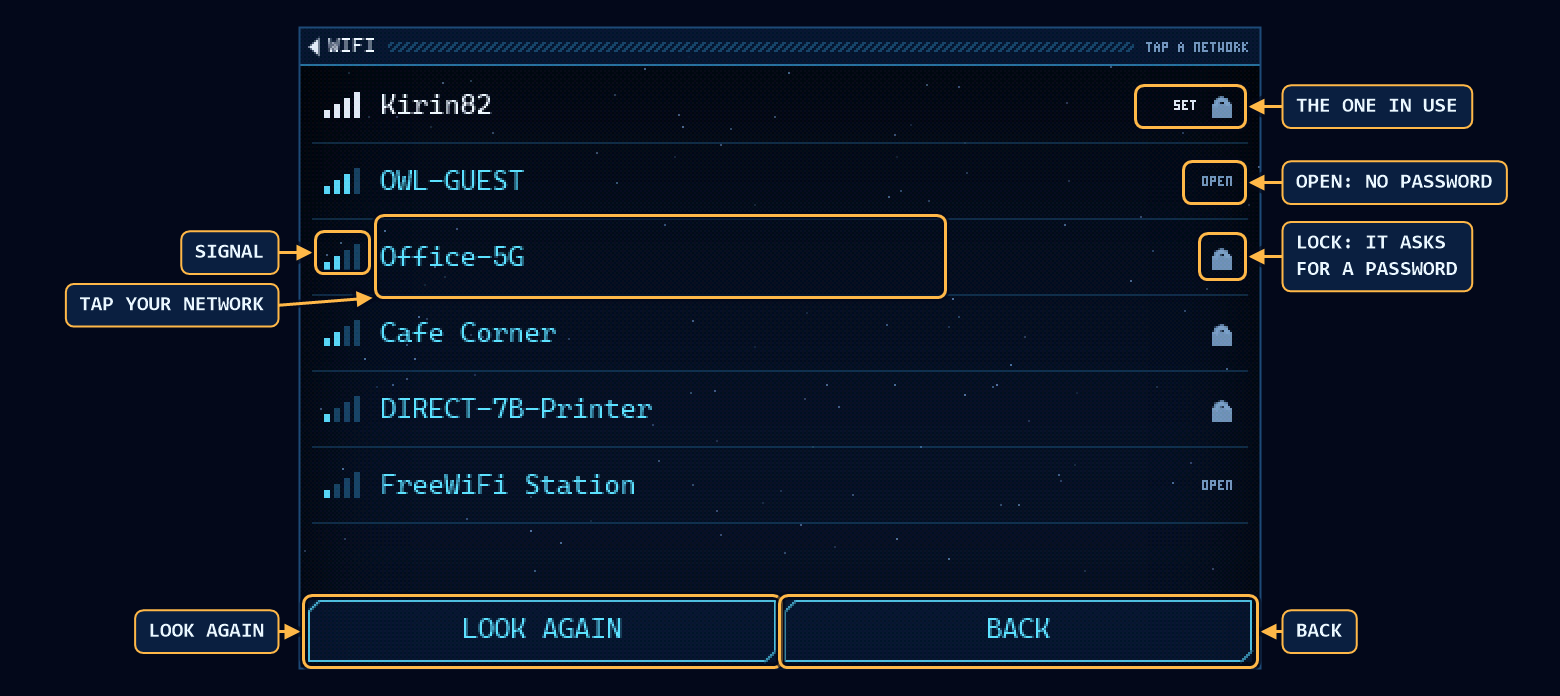
    the WiFi networks the board hears, with arrows: signal, tap your network, the one in use, open, lock, LOOK AGAIN, BACK

    THE NETWORKS

    • The networks the board hears, the strongest first. A lock asks for a password, OPEN does not, SET is the one in use.
    • Tap your network. LOOK AGAIN looks round once more. The ESP32 hears 2.4 GHz networks only.
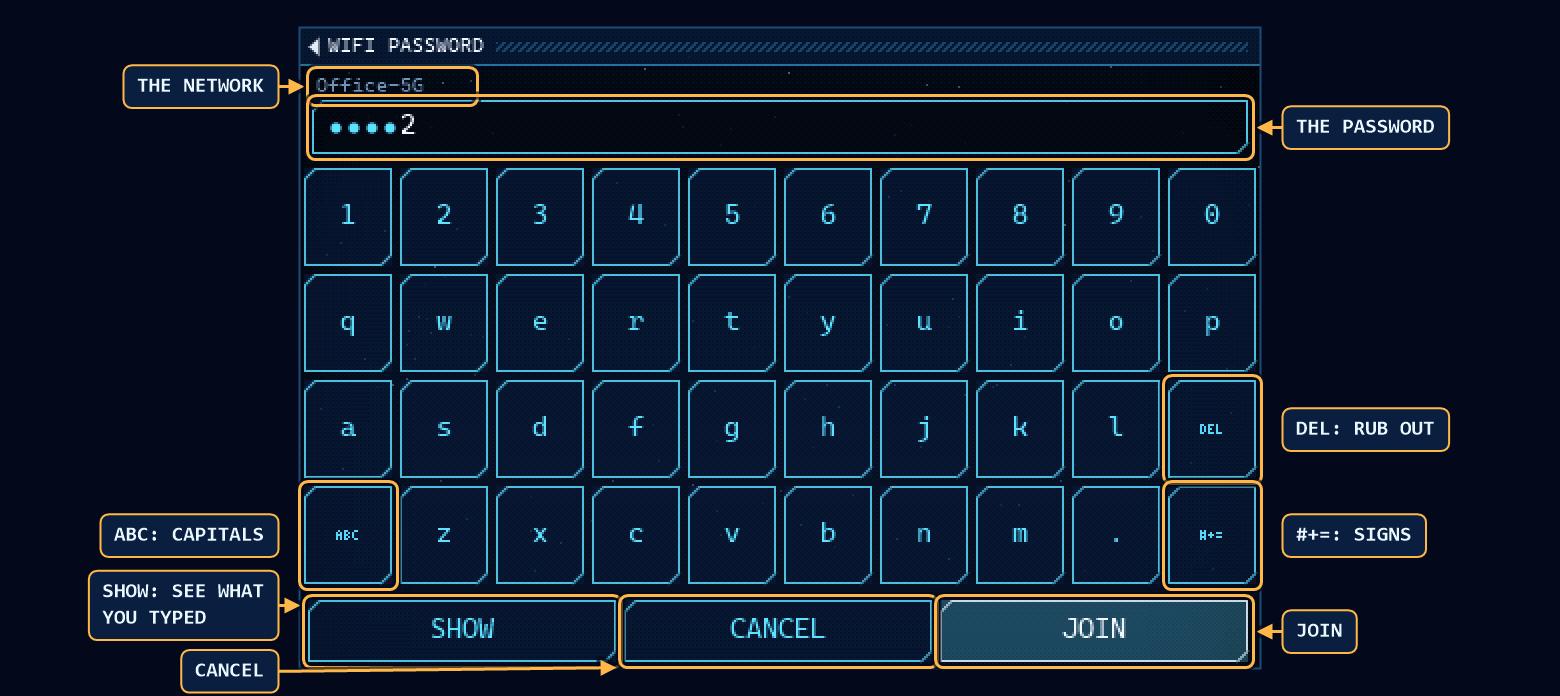
    the keyboard for the WiFi password, with arrows: the network, the password, ABC, #+=, DEL, SHOW, CANCEL, JOIN

    THE PASSWORD

    • Dots for what you typed, the last letter shows for a moment. SHOW shows all of it.
    • ABC gives one capital, #+= the signs, DEL rubs out, held it goes on.
    • JOIN: the board joins the network and the real planes come in a few seconds. The password goes into the board and stays there.
    the 2.8 inch board in its first seconds: a card says SCREEN WRONG? PRESS BOOT

    THE 2.8" CYD: WHICH SCREEN

    • It is sold with three different screens and starts as v2, the one most boards have. Wrong colours or a mirrored picture: press BOOT, the small button on the board, within 8 seconds after power on, again till it looks right: v2, v1, v3. It keeps that one. More under the boards in step 1.
    the round glass with arrows: tap an empty spot for the menu, HUE, the look, LIST and SET, drag the rim, tap a plane

    THE ROUND GLASS

    • The whole glass is the scope. Tap an empty spot for HUE, the look, LIST and SET.
    • Tap a plane for its card under home, tap the card for the next one.
    • The rim turns the map and inside zooms, like on the square boards. Its WiFi comes from this page, step 2.